Paying your QuickBooks Bills can be easier (even pain-free!) – when you use your software to its fullest capacity.
QuickBooks Pay Bills with a Credit Card
Company owners and bookkeepers often use credit cards to pay QuickBooks bills.
Those who appreciate the convenience of purchasing items or paying bills using credit cards often ask how to properly enter those transactions in QuickBooks Pro, Premier, or Enterprise Desktop.
Why Pay Bills With A Credit Card?

Many business people choose to make purchases or pay bills with their credit card. There are advantages to using a credit card for payment:
- They may like it because of the ease and convenience of paying by phone or online
- The person paying the bill may be at a vendor’s location and wants to pay their bill when onsite
- They may prefer to pay using a credit card for tracking or security purposes (credit cards are typically less risky than paying with a check)
- And a big one (especially for companies who make large purchases) is that they get to earn bonus points for travel, additional products, or money-back credits!
Paying QuickBooks Bills with a credit card is a common choice and one that you’ll want to know how to handle and properly account for in QuickBooks.
Credit Card Payments In QuickBooks Bill Payments
Situation 1: You’ve entered a bill into your QuickBooks, and it’s now listed as an outstanding payable. You’ve just determined that some of these QuickBooks Bills were (or will be) paid with a credit card. After authorizing the payment through your credit card company, here’s how to record the Bill Payment in QuickBooks:
To record your Credit Card Bill Payment in Quickbooks:
- Go to the bottom of the Bill Payments screen and set the date that your Bill Payment will (likely) appear on your credit card.
- Locate the “Method” field and select ‘Credit Card.’
- Then, go to the ‘Account’ field and choose the credit card account that you’ll be using for payment.

From the top of the Bill Payments screen,
- Select the Bill(s) you want to pay with that credit card.
- Click on the “Pay Selected Bills” button, and Shazam! Your Bill Payment is properly recorded in QuickBooks, AND the outstanding balance for the credit card you chose in step 3 (above) is increased.
Warning About QuickBooks Bill Payments Using Credit Cards
Remember! QuickBooks will ‘remember’ that you paid your bills with that credit card, and the next time you pay bills, guess what? It will default to the most recent payment ‘Method’ you used!
So if you just paid some QuickBooks Bills via credit card and later choose to pay bills in a different way (e.g., to pay the Bills using a checking account or via Online Payment), and if you forget to change the “Method” and “Account” fields, you could end up with a lot of payments going against the credit card account. Aaargh! You may find yourself with lots of manual corrections to pull through.
So always check the “Method” field at the bottom of the screen before you hit the “Pay Selected Bills” button!
Vendor Credits in QuickBooks: Paying Bills with a Vendor Credit
Situation 2: It’s time to pay the company bills. You want to ensure that you don’t overlook any outstanding Vendor Credits that will reduce the amount you pay to a vendor.
Here’s a quick way to make sure that you find (and apply) the Vendor Credits you deserve as you pay your bills using QuickBooks!
(Two benefits are that you will reduce outgoing cash and you’ll keep your records in alignment with your vendor!)
BEFORE paying Bills: Review the current status in QuickBooks for the vendor bills you want to pay.
My favorite “background review’ reports include the following (note that Vendor Credits will show up as a negative number within your detailed reports):
- Accounts Payable Aging Summary,
- Unpaid Bills Detail and
- Vendor Balance Detail.
 …
…
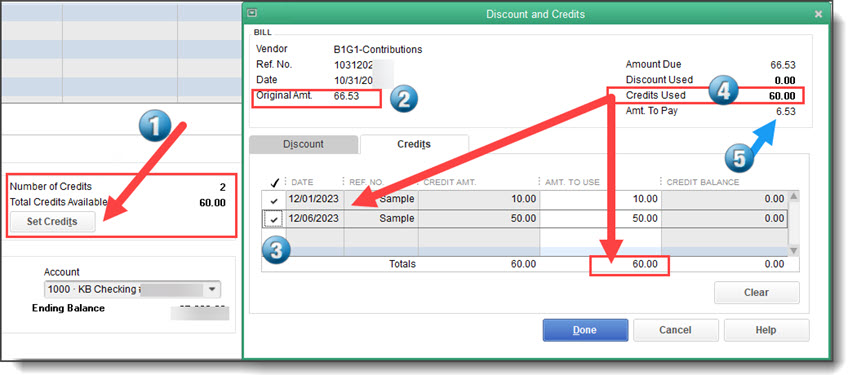
When you’re ready to pay your Bills, and you place a checkmark in the leftmost column for a Bill that you want to pay, if a vendor credit exists, the Set Credits button at the bottom of the screen will transform itself into a ‘clickable’ button:
- When you click that button, you’ll see how many credits exist and the total $ amount available.
- You can then click the button and select the credit(s) that you want to apply to that Bill.
- QuickBooks will apply the vendor credit(s) to the Bill and reduce the amount that shows in the ‘Amount to Pay’ column.
- If at all possible, apply smaller credits against larger bills. Why? When a credit pays the entire bill, the credit will “disappear.”
- For better tracking, apply a smaller credit to a larger bill so the information will show up on the check voucher that goes to the vendor. This makes it easier for them to see how you’ve applied the credits.

These tips regarding how you can easily enter your credit card bill payments and how to apply your vendor credits should help you pay all of your QuickBooks Bills more efficiently.
![]()
People Also Ask
FAQs (Frequently Asked Questions)
1. How can I pay QuickBooks bills using a credit card?
Go to the Bill Payments screen, set the date for the payment, select ‘Credit Card’ in the ‘Method’ field, choose the appropriate credit card account, select the bills to pay, and click “Pay Selected Bills.”
2. What are the advantages of paying bills with a credit card in QuickBooks?
Advantages include being able to enter “after-the-fact” bill payments, seeing evidence on your credit card statement that a Bill Payment was processed, not having to print, sign, and send a check to a vendor, credit-card convenience, security, ease of payment by phone or online, and earning bonus points for travel or cash-back rewards.
3. How does QuickBooks remember my last payment method?
QuickBooks defaults to the most recent payment method used. To avoid errors and time-consuming corrections, always check (and potentially modify) the ‘Method’ field before paying bills.
4. What should I do if I accidentally pay bills using the wrong method?
You can manually correct the transactions by changing the payment method and account in the Bill Payments screen.
5. How do I apply vendor credits when paying bills in QuickBooks?
Before paying bills, review the underlying detail in your Unpaid Bills or Vendor Balance Detail reports. Note your vendor’s outstanding credits. When you pay bills, check for existing credits and click ‘Set Credits’ to apply them to the bill before you pay it.
6. Why is it important to apply smaller credits to larger bills?
Applying smaller credits to larger bills keeps the credit information visible on check vouchers, making it easier for vendors to track how you applied their credits.
7. How can vendor credits reduce my cash outflow?
Applying vendor credits reduces the amount you need to pay out-of-pocket. This helps to optimize cash flow and keeps your records current and aligned with vendor statements.
8. What reports can help track vendor credits in QuickBooks?
Use the Accounts Payable Aging Summary, Unpaid Bills Detail, and Vendor Balance Detail reports to monitor and manage vendor credits effectively.
9. What steps should I follow to ensure accurate credit card bill payments?
Set the payment date, select ‘Credit Card’ as the payment method, choose the correct credit card account, and verify the bill payment amounts before confirming the payment. You may also wish to check your online credit card account entries.
10. Where can I find more information on paying QuickBooks bills with credit cards or vendor credits?
More detailed guides and resources are available on the Build Your Numbers website.
![]()
Want More Info On QuickBooks Bill Pay?
If this information helped you, check out our affordable QuickBooks subscription training series. If you’d like individual coaching or have any questions, please give us a call or send us an e-mail today.
At Info Plus, we offer a wide range of affordable workshops and training specific to job costing using software such as QuickBooks® desktop and Excel. We love teaching and coaching, so if you’re ready to learn, we’re here for you.
…

You can sign up for any of our workshops or training tutorials and learn what you need to know 24/7. If you’d like to learn more about the training, please send an email or call. We’ll be happy to explain how it works so you can decide if it would be a good fit for you and your business.
We look forward to hearing from you and learning more about how we can help…
You’re Never Alone – We’re Here to Help You With QuickBooks
We’re here for you. You may be a bookkeeper looking for detailed QuickBooks help or you may be a business owner who’s choosing to take control of your financial future using QuickBooks and Enterprise as your management tool.
In either case, we’ll help you learn how to use your numbers in ways that are designed to help you boost your business success and profits!
Customer Praise For Diane Gilson, Info Plus Consulting, and BuildYourNumbers.com
⭐⭐⭐⭐⭐ From the Intuit FindAProAdvisor website:
“Diane has been a great asset for fine-tuning my QuickBooks for management accounting and reporting. She is very thorough and works hard to make sure I understand the reasoning for her changes to my accounting. Great job, Diane – I look forward to continuing the improvement to my reports!”
See More Customer and Client Comments

