Hierarchical View in QuickBooks
Do you have QuickBooks lists structured to show in a Hierarchical View? (Think “outline” with headers and sub-elements.) For instance:
- In your Customer:Job list, do you have a “header” as a Customer and sub-elements as Jobs? (If not, you may want to do so…)
- Open your Item List. Do you have multiple “layers” of Items arranged in an outline (hierarchical) order? (If so, good! You’ll get better reports.)
- Within your Chart of Accounts Lists, do you have “parent/header” accounts with sub-accounts arranged below? (This structure will provide more understandable and useful management reports.)
Assuming you’ve used the very useful Hierarchical Lists in QuickBooks, you’ve likely experienced the same pain-in-the-fanny problem that my clients and I have encountered.
Hierarchical View in Your Customer:Job List vs. Flat View
There are two options where you view your Customer: Job List: flat view or hierarchcial view.
QuickBooks Customer: Job List Flat View
Some people look at their Customer: Job List in “Flat View.” In other words, you see the sub-elements listed with their “parents” preceding the job name(s) separated by colons. For instance, you see something like this:
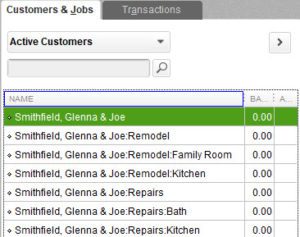
Smithfield, Glenna & Joe
Smithfield, Glenna & Joe:Remodel
Smithfield, Glenna & Joe:Remodel:Family Room
Smithfield, Glenna & Joe:Remodel:Kitchen
Smithfield, Glenna & Joe:Repairs
Smithfield, Glenna & Joe:Repairs:Bath
Smithfield, Glenna & Joe:Repairs:Kitchen
QuickBooks Hierarchical View to the Visual Rescue!
Other people prefer to see their Customer: Job List in more of an outline format. So if you right-click on a Customer or Job from the drop-down menu, you can select Hierarchical View. Now it looks like this. (Much easier to read, right?)
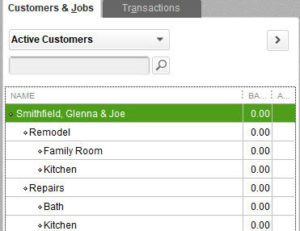
Smithfield, Glenna & Joe
…Remodel
……Family Room
……Kitchen
…Repairs
……Kitchen
……Bath
…
…
So far, life is good! BUT THEN you experience…
The QuickBooks Disappearing Hierarchical View…
You need to change something in one of these Customer or Job records – such as add a phone number – so you Edit, and Save the edited record.
BOOM! Your entire list shifts back into the Flat View!
Arrrgh! Now, you have to manually switch it back into the Hierarchical View.
THEN you do a “Search” for a name, and results show up in Flat View. (QuickBooks warns you this time: “All search results will appear in flat view.” OK, we understand and could live with that on a temporary basis while we’re searching, right?)
BUT NOW – you CLOSE the Search – and BOOM! The entire list STAYS in the Flat View. So, once again, you need to manually select the menu option to change back into the Hierarchical View. (Yuck!)
Creating a Default “Hierarchy” Setting in QuickBooks
I want to give my Diamond-Level Intuit Support Team some credit here – they provided a one-time fix and tried to explain it several months ago. But the “fix” didn’t seem to hold, and I continued to have the problems outlined above.
Then, I decided to take some time to EXPERIMENT to see if I could cage this nasty little gremlin.
Yaaay – I believe I’ve got it! Here are the steps I currently follow to get the Hierarchical View to “stick” as a default…
- Close all QuickBooks windows.
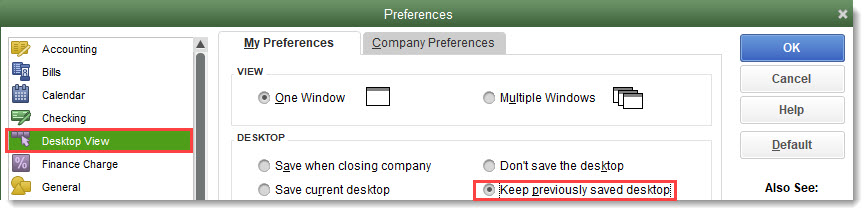
- Go to Edit/Preferences/My Preferences/Desktop View
- If you do NOT see “Keep previously saved desktop” (shown in the red box below) select “Save current desktop,” then OK, and return to the same Preference screen.
- Select Keep Previously Saved Desktop – then OK.
- Open the following primary Lists and set each of them to display “Hierarchical View”:
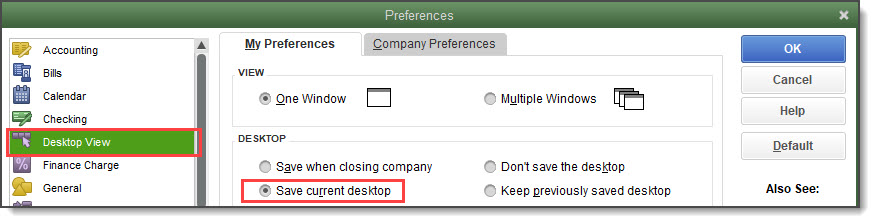
- Go back to Edit/Preferences/My Preferences/Desktop View.
- Choose Save Current Desktop – then OK.
- Return to Edit/Preferences/My Preferences/Desktop View.
- Select “Keep Previously Saved Desktop” again – then OK.
Testing the Quickbooks Hierarchical View “Fix”:
- After closing the company file, then closing and re-opening QuickBooks, these three frequently-used Lists automatically appeared – as I had requested.
- Each still displayed in hierarchical order.
- I closed and re-opened individual lists, and each of them stayed in the Hierarchical View.
- I then edited information within various header and sub-elements residing in the lists, and the Hierarchical View stayed in place.
- Even after searching for a specific Customer, Job, Item, or Account (for which results ALWAYS display in a temporary Flat View), when I closed the search, the List popped back into Hierarchical View.
Now I’m doing “the happy dance” because this workaround removes those extra keystrokes and the accompanying moments of “Do-I-REALLY-have-to-re-set-the-Hierarchical-View-AGAIN!!??” frustration.
So, I’m excited to share this with my clients – and with YOU! 😊
NOTE…
Unfortunately, I’m not able to promise that this workaround will “hold” forever.
On several occasions, I’ve had to repeat these steps within my company file. However, after learning the steps to the process, it doesn’t take long to re-do. And it DOES seem to hold (at least for a while).
If we get to sidestep an annoying set of keystrokes MOST of the time, it’s likely worth that small additional amount of time to repeat the background settings!
Diane
![]()
People Also Ask
FAQs (Frequently Asked Questions)
1. What is a hierarchical view in QuickBooks?
The hierarchical view in QuickBooks is an organized structural list where “parent” Accounts, Items, and Customers have sub-Accounts, Sub-Items, or Jobs that are visually indented below their “parent” (or “header”). The resulting format resembles an outline.
2. Why is the hierarchical view important?
The hierarchical (expanded) view provides a clear, organized structure for Lists in QuickBooks. It makes the relationship between “parent” and “sub-elements” visually accessible and understandable.
3. How do I switch to the hierarchical view in QuickBooks?
Right-click on a list (e.g., Customer:Job list) and select “Hierarchical View” from the dropdown menu.
4. Why does QuickBooks sometimes revert to the flat view?
Certain actions, such as editing records or performing searches, can cause QuickBooks to revert to the flat view.
5. How can I set the hierarchical view as the default in QuickBooks?
Follow the detailed steps shown in the blog (above) to set your preferences.
6. Does the hierarchical view improve report accuracy?
Yes, using the hierarchical view can enhance the accuracy and clarity of reports by helping you see and logically organize your data.
7. Can I use hierarchical view for all types of lists in QuickBooks?
You can set hierarchical views for the Chart of Accounts, Item List, Classes, and the Customer:Job list. Many other Lists in QuickBooks are organized in alphabetical or numerical order.
8. What should I do if the hierarchical view doesn’t stay set?
Follow the detailed steps shown in the blog (above) to reset your preferences. In many cases you will be able to save the desktop view to meet your preferences.
9. Will searching in QuickBooks always show results in flat view?
Yes, search results appear in flat view by default, but you can switch back to hierarchical view after closing the search.
10. Where can I find more information on setting the hierarchical view in QuickBooks?
More detailed instructions and tips are available on the Build Your Numbers website.
![]()
Get More Time- and Frustration-saving QuickBooks Info
If you liked this tip, we have a boatload more in our CAMP Class called Tips, Insights, & Techniques for QuickBooks
Customer Praise For Diane Gilson, Info Plus Accounting, and BuildYourNumbers.com
⭐⭐⭐⭐⭐ From the Intuit FindAProAdvisor website:
“Diane was fantastic to work with. They have [been] extremely helpful as we transitioned into Quickbooks. I can not recommend them enough.”
See More Customer and Client Comments